StarCode
Inventory Management
&
Point of Sale System
User Manual
Version 3.0.0
https://www.starcodepos.com/starcode
Preface
This user manual of StarCode Inventory Management & Point of Sale System software is to help the beginners of this software. It is written so that users who have no prior experience of using this software can benefit from it. If users of this software have any questions about some functionality, then they can refer to this manual.
StarCode is designed to basically automate the process of buying and selling. It works as your silent business assistant. This software makes tedious tasks for managing inventory, keeping track of sales, purchases and expenses easy. The user interface is responsive and can fit to different screen sizes.
It has been tried as much as possible to answer all questions raised previously by users of this software. All software interfaces and dialogs have been separated into different chapters and explained individually. This manual is divided into twenty chapters. It is written in simple and easy to understand language.
This user manual of StarCode is for version 1.0.0 of StarCode Lite, StarCode Plus, and StarCode Pro editions. Previous and future versions of the software are similar to this version, and hence this manual is also useful for old versions as well.
Table of Contents
2.1. Operating System Requirements 5
5.6. Small Receipt Settings 13
5.7. Point of Sale (POS) Settings 13
5.9. Product Images Settings 16
5.10. MySQL Server Settings 17
6.1. StarCode Express Database Management 18
6.2. StarCode Network Database Management 19
7.1. Backup and Restore for StarCode Express 20
7.2. Backup and Restore for StarCode Network 20
13.1. Adding and Updating Inventory 28
18. Inventory Import and Export 37
StarCode is a complete inventory management and point of sale application currently available for Windows and Android. StarCode has been designed keeping in view the quick learning. You will find the user interface responsive and intuitive. User interface has ability to fit to different screen sizes automatically.
This document will teach you the basic system requirements to run StarCode, and it provides detailed instructions on how to configure and operate the software.
StarCode can run on most of the systems without any special configuration. If you are planning to purchase specific hardware components, please read the following sections carefully.
Windows: You can run StarCode on all different variants of Windows, from Windows XP to latest Windows 10.You can also run on Windows 10 touch screen tablets.
Android: You are required to have Android version 2.1 or above to run StarCode. The recommended tablet size is 10 inch, but it can also fit perfectly to 7 inch tablets if the screen resolution is high.
Windows PC or Tablet: 200 MB free hard disk space, 2 GB or more RAM, 10 inch screen size or more is recommended.
Android Tablet: 200 MB free disk space, 1 GB or more RAM, 10 inch screen size is recommended, or 7 inch screen size with high resolution.
StarCode can print to PDF files and all printers which are available under system.
Windows Printing: Desktop and thermal receipt printers are supported. Any printer with a Windows driver will work with StarCode.
Android Printing: Android printing technology is still evolving. In order to have printing support on Android you must have newer version of the Android that can support printing to LAN printers or via Google printing app.
Windows: You can connect any barcode scanner via USB. You would need to configure it according to the instructions provided under Barcode settings section.
Android: On Android you would need a Bluetooth or wireless barcode scanner.
Windows: You can connect any electronic scale via USB. You would need to configure it according to the instructions provided under electronic scale settings section.
Android: On Android the electronic scale interfacing is not supported yet.
Windows: You can connect a pole display via USB or a second screen in dual display mode. You would need to configure it according to the instructions provided under pole display settings section.
Android: On Android the poly display interfacing is not supported yet.
Windows: All different variants of StarCode are provided as Windows installers. You can download the installer from following product page
https://www.starcodepos.com/starcode . Installation is easy and quick. You can find installation video tutorial on https://www.starcodepos.com/support/starcode_tutorials.php .
In order to operate StarCode in network mode, you would need to install the MySQL Server on the same computer, in cloud, or on a separate dedicated computer. There is a separate document available on the website for MySQL Server Installation and Configuration.
This guide is available in HTML format from the following link https://www.starcodepos.com/support/mysql_installation_guide.php .
Android: If you are planning to purchase from Google Play store, then install the StarCode app directly from the Google Play store. If you are purchasing from some other channel, for example, from InveGix website, then download the apk file (Android Installer) from the website. Copy this file to the device and install it manually.
StarCode demo version has no time limit, but has some limits on the features. You will also see watermarks on sales receipts and purchase order generated via the demo version. You can use the demo version as long as you are comfortable with these limitations. If you decide to upgrade to full version, then license key is required for activation. At the time of purchase you will be provided with a license key with instructions for activating the product.
It is highly recommended that you use the Activation Dialog for activating the product.
Make sure you are connected to internet when activating the product. Launch the Activation dialog from Help->Activate menu option. Once the product is activated, then you can use it without any Internet connection in the offline mode.
If you are unable to activate the product using Activation dialog, then please contact the support team on support@starcodepos.com with your license key and machine code displayed on the Machine Code tab of Activation Dialog.
For complete activation and deactivation guide, please visit following page https://www.starcodepos.com/support/activation.
Each variant of StarCode (Lite, Plus, Pro) can be configured to operate in Express or Network modes. You can switch between the modes of operation from User->Switch to Mode menu option. By default, after first time installation, the software will be in Express mode of operation. In Express mode, the software does not require any extra database installation or configuration. The software uses its internal database and all the data is stored in the files on your device or computer.
In Network mode, the software requires MySQL server to be installed and configured on the same computer, or some other computer on the network. You can always switch between these two modes of operation as required.
You can customize StarCode through configurable settings. This section describes different settings and how you can use them. You can launch Settings dialog by clicking on Settings icon on the home screen, or via Tools menu option. It is important to note that you would have to configure each computer separately after installation of the software.
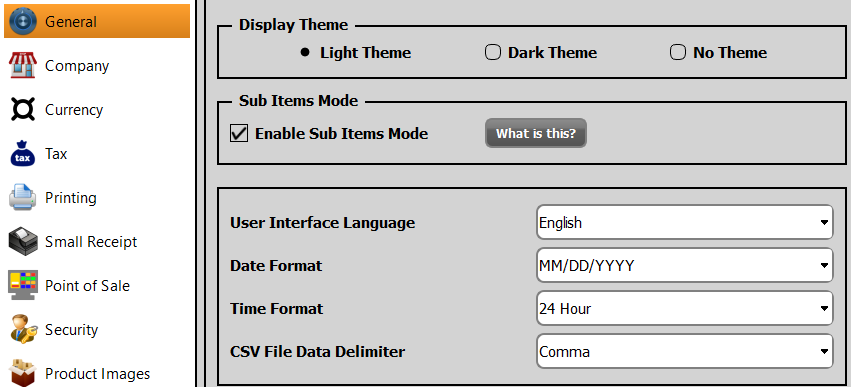
Display Theme: You can choose among different display themes as shown in the following screenshot:
If you check Dark Theme and then save, following theme will be displayed:
Sub Items Mode: This mode is disabled by default, and in most cases you might not require this function. This mode is useful when you need to have fine control over the product quantities being sold. Enable this mode if you want to sell sub quantities as shown in the following screenshot:
For example, if you are adding pack of 12 bottles of coke as a product, and want to sell both individual bottles and pack of 12 bottles. If this mode is enabled, the price for one bottle will be calculated automatically, and system will allow you to enter amount of bottles as sub quantity. Another example would be selling items which require price calculation from weight. For example you can add the price of 1Kg of sugar in the system. If this mode is enabled then price of sugar in grams will be calculated automatically by the system. System will keep track of sub quantities and quantities.
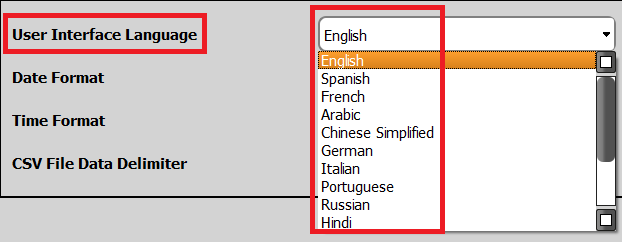
Language: You can switch between different languages. After selecting the language, you would have to restart the application to load the new language settings as shown in the following screenshot:
Date Format: You can select the appropriate date format according to your requirements as shown in the following screenshot:
This setting will be used to display dates in reports, receipts, and invoices and purchase orders.
Time Format: You can select time format either in AM/PM, or 24 Hour format. The time will be printed according to this format on receipts as shown in the following screenshot:
CSV File Data Delimiter: Default selection is Comma, but you can choose some other as well. StarCode allows you to export data in CSV format, which you can open in Excel or some other program of your choice. The exported data will delimited according to this selection as shown in the following screenshot:
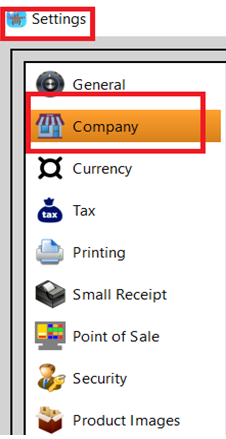
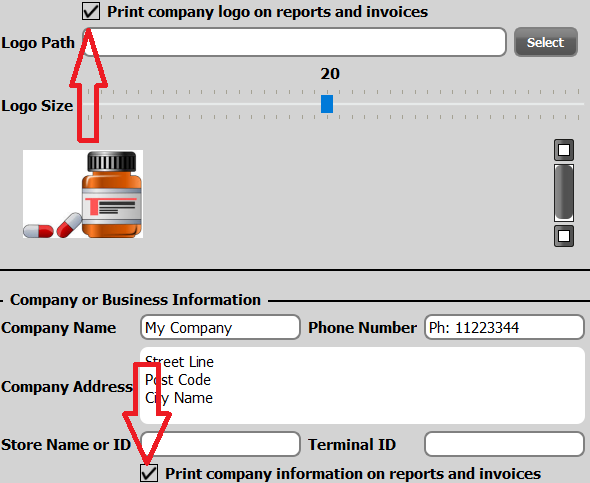
Adding logo: If you want to add the logo of your company, simply go to settings and then click on company as shown in the following screenshot:
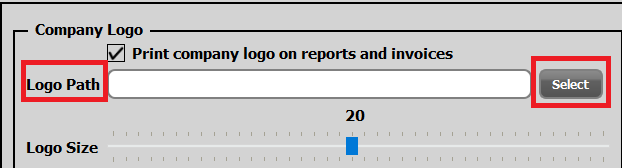
Then add the path where the image of your company’s logo is present as shown in the following screenshot:
Now, click on the check box and the logo will be displayed on invoices and reports.
Most of the settings under settings->company are self-explanatory. Few things require some explanation.
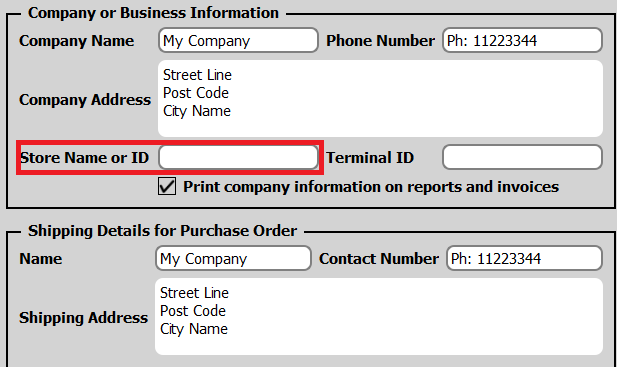
Store Name or ID: In case you are using StarCode in Network mode or even in Express mode in different locations, it is highly recommended to enter the name of store, location, shop, or office as shown in the following screenshot:
All the sales transactions will be logged against this value, and will help you to identify and group sales by this store ID.
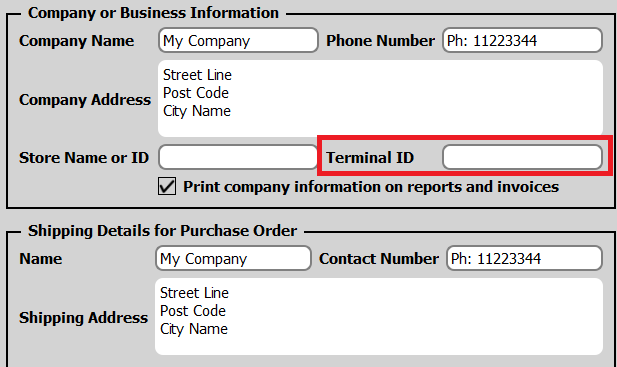
Terminal ID: If you are using StarCode in network environment, for example multiple terminals at one location, then assign a unique ID to each terminal and enter this value on each computer. All the sales transactions will be logged against this ID, and will help you to identify and group sales by this terminal ID.
Print Company Information and Logo: There are two check boxes, if checked then company information and logo will be printed on receipts, reports and purchase orders as shown in the following screenshot:
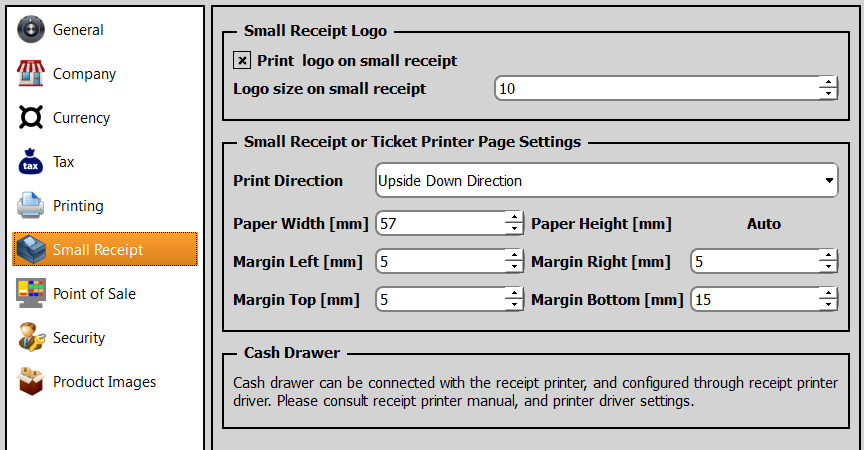
This function is useful when you do not want to print the company information and logo on already printed invoices or receipts. This applies only to large size invoices and receipts. For small receipts there is a separate setting under Small Receipt settings tab.
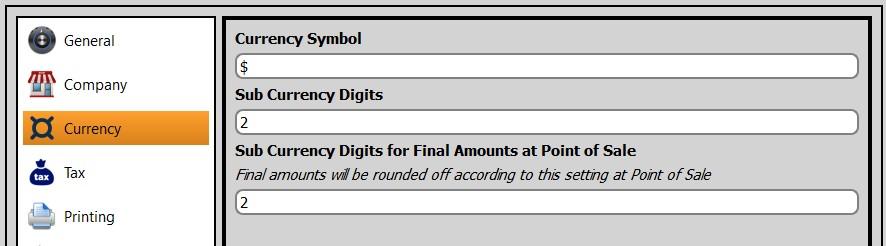
Currency Symbol: You can enter currency symbol or currency name abbreviations such as $, £, GBP, or EUR.
Sub Currency Digits: Most of the currencies have two sub currency digits. Some currencies, for example, Bahraini Dinar is divided into 1000 fils and has three sub currency digits. Amounts will be displayed according to this setting.
Sub Currency Digits for Final Amounts at Point of Sale: This setting will affect how the final due amounts at point of sale will rounded off. For example, if this setting is set to 0 and final due amount to be paid turns out to be $90.80. This amount will be rounded off to $91 according to this setting. Similarly if this setting is set to 1, then only one digit after decimal will be retained and a due amount of $90.47 will be rounded off to $90.50.
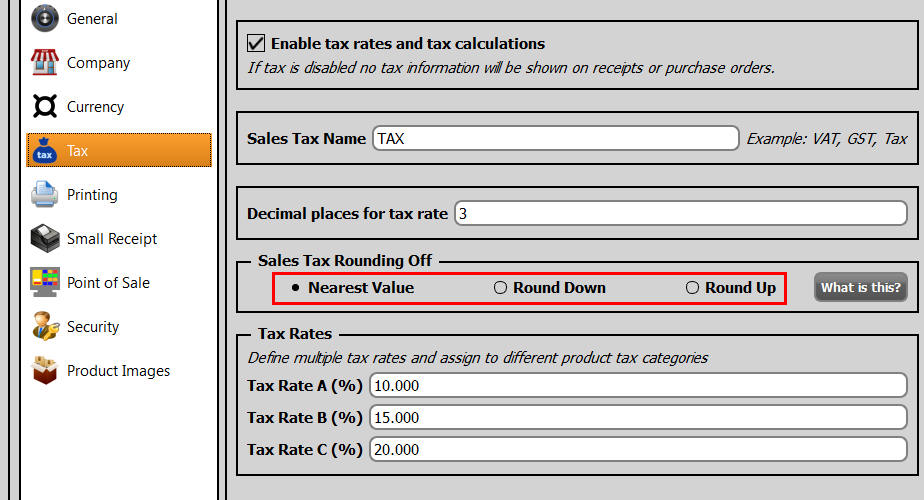
Enable Tax Rates: By default this mode is enabled. In some countries there is no sales tax, or if your requirement is to disable sales tax calculations, then uncheck this box.
Sales Tax Name: In some countries sales tax is called VAT or GST. Here you can enter the name according to your local requirements.
Decimal Places for Tax Rate: Some states and countries have sales tax rates up to three digits after decimal. If you require more decimal precision of the tax rates, enter that value here.
Sale Tax rounding Off: In many cases sale tax rounding up is required by some states and local laws then select the round up option. Following example will illustrate the difference:
Consider the tax rate for a product is set to 7.25%, and the price of the product without tax is 10. After applying the sales tax the price of the product will become 10.725. If your currency is USD, then you will have to round off this figure. If the first option Nearest Value is selected then the rounded off figure will become 10.72, and if the Round Up option is selected, then the rounded off figure will become 10.73. Similarly Round Down option will make it 10.72.
This is a minor difference, but required by some countries and states to round up the last significant digit after decimal.
Consider another example, where the amount before rounding off is 10.726. Then in two cases (nearest and round up) after rounding off the figure will become 10.73. If the third option (round down) is selected then final figure will become 10.72. If the amount before rounding off is say 10.724, then in all cases after rounding off the final amount will become 10.72. So the difference is only when the digit at third decimal place is 5.
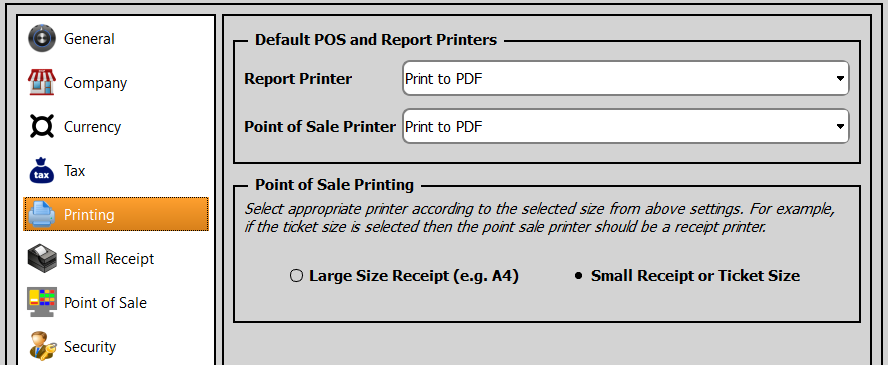
Report Printer: This refers to desktop printer for printing reports in large size (e.g. A4). If set to “Print to PDF”, then PDF files will be generated on printing.
Point of Sale Printer: This is the printer that will be used by POS module for printing receipts and invoices. Please note that if you have selected small receipt for point of sale printing, then appropriate printer, e.g. thermal or receipt printer should be selected. If you want to print receipt or invoices in large size then you can also select any desktop printer, but at the same time, select large size receipt under point of sale printing setting.
Point of Sale Printing: These settings determines whether you want to print large receipts or invoices (e.g. A4 size), or small receipts (tickets). If you have selected large size, then point of sale printer should be able to print large size receipts. Similarly if you have selected small receipts, then point of sale printer should be able to print receipts or tickets.
Small receipt refers to the printout of thermal or receipt printer. All margins are preconfigured, but you may have to adjust according to your printer and page size settings.
You can also choose to print logo or not on receipt. In order to print logo on receipt your receipt printer should have capability of printing graphics. StarCode would work with any receipt printer which comes with a Windows driver.
Cash Drawer: You can also connect cash drawer via receipt or thermal printer. Most of these printers have additional ports for connecting cash drawers. You can configure to open the cash drawer via printer driver settings. Please consult your receipt printer’s user manual for connecting cash drawer.
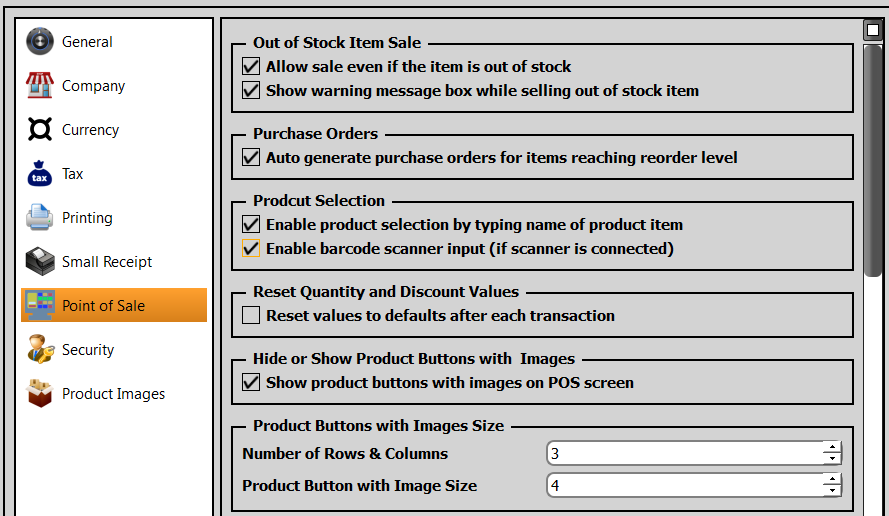
Out of Stock Items Sale: If this check box is checked, StarCode will allow to sell even out of stock items and the quantity may go into negative. Additionally you can also configure to show warning on selling out of stock item.
Auto Generate Purchase Order: If this check box is checked, StarCode will generate purchase order automatically when stock level reaches Reorder Level set at the stock level of an item.
Reset Quantity and Discount Values: If this check box is checked, values entered in quantity and discounts boxes on the POS screen will be set to defaults after each transaction.
Product Selection: You can select a product in many different ways on the POS screen. This setting allows you to hide or show required functions on the POS screen in order to make maximum use of the space on screen. If you are not using the Barcode scanner, then it might be good to uncheck the box related to Barcode input under product selection. Similarly if you do not want to select the product by typing, then uncheck the box which says enable product selection by typing.
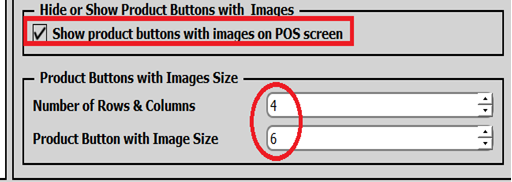
Point of Sale Buttons: These are the buttons with pictures shown on the right side of the POS screen. You can add products to sale by simply pressing these buttons. If you do not want to show these buttons on the POS screen then uncheck the box labeled as “Show POS Buttons Tab”. This will hide the whole tab.
If you choose to show POS buttons tab, then there are two further settings to customize the look of POS buttons tab. You can adjust the size of buttons and also the grid size (number of rows and columns of buttons). You must adjust buttons and grid size according to the screen resolution.
Default Sales Mode: Point of sale module can operate in two modes, invoice mode and sales receipt mode. In invoice mode you can additionally specify the payment status and due date. The printing format would also be different. Here you can specify the default mode, and point of sale module will always start in the default mode, but would allow you to switch to other mode whenever you want.
You can also specify the title of receipt or invoice that you would like to print.
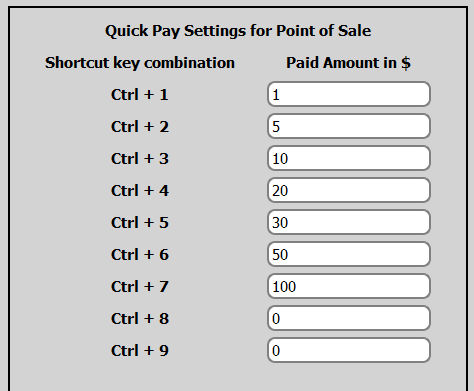
Quick Pay Settings: Quick pay settings dialog allows you to associate fixed amounts with short cut buttons. This function minimizes the time associated with closing a sale. Please close every sale by entering the amount paid by the customer. Normally you would have to enter that amount by using the keyboard. If you have configured different amounts through quick pay settings, then you can simply enter amount by pressing one short cut button.
Consider the settings shown in the above figure. Ctrl+3 key combination is associated with $10. If you press Ctrl+3 (Pressing Ctrl Key and 3 Key at the same time) on POS screen, $10 will be entered in the PAID box and sale will be closed automatically. This significantly reduces the number of keys you need to press for closing a sale.
Barcode Scanner: POS screen will catch all the codes sent by scanner. You can always set the input focus to scanner input field by pressing Ctrl+B on your key board. Ctrl+B means pressing key “B” and key “Ctrl” at the same time. If you want to use barcode scanner, please configure following prefix and suffix on scanner.
Scanner Prefix: Ctrl+B with hex or decimal value 02. It is also called STX character. This is necessary to focus the cursor in the scanner input field.
Scanner Suffix: Please add Carriage Return, Enter key, or new line character at the end of code. The new line characters (CRLF) are coded as 0x0D (13 decimal) and 0x0A (10 decimal). After this configuration, you can test the scanner with any editor. Please consult your scanner's manual to program this function. Each scanned code should appear on a separate line. Ctrl-B shortcut (pressing keyboard key B and Ctrl at the same time) will move the cursor to scanner input field if the focus is not set to input field. Prefix on the scanner will do the same job as well.
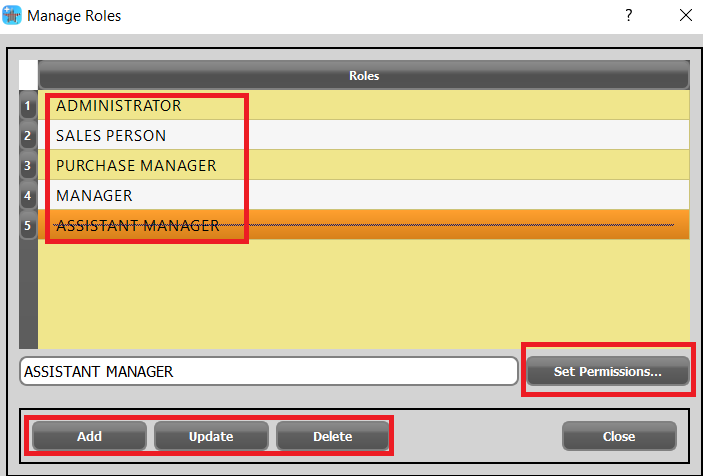
Security settings allow you to manage user roles and permissions. ADMINISTRATOR role is the system role and you cannot edit it. This role has access to all system functions without any restrictions. After first time installation, when there is no user added, system logs you in as an ADMINSTRATOR. You can add new users and assign them different roles and manage their permissions. This will restrict access according to the permissions assigned.
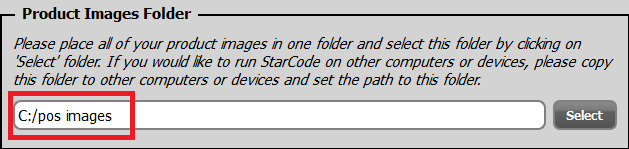
It is highly recommended that you place all of your images in one folder, and set the path to this folder by pressing select button. If you want to run StarCode on some other computer or device, simply copy this folder and again set the path on new computer or device via this setting. If you did not set path correctly after copying, then the images will not be displayed in product management and point of sale modules.
This section is specific to StarCode in Network mode. After you have installed the MySQL server, you would have to provide the connection parameters. Please make sure your MySQL Server is running. You can check this via Windows Services. If installed locally on Windows computers, you can confirm this by launching Windows services and see if MySQL server is in the list and in the started state.
You can host MySQL server in the cloud environment as well. If hosted in the cloud or on some server with public access, it will enable you to access the inventory and sales databases from anywhere and at any time from tablet, phone, PC, or laptop. You need to provide following parameters on this dialog for connecting to server:
Server Address: IP address of the computer where the MySQL server is installed. If it is on the same computer where StarCode is running, set it to localhost or 127.0.0.1
Port Number: MySQL server default port number is 3306
User: Default user is root, if you have created some other user; enter the user name in this field.
Password: Password of the MySQL user. During installation of MySQL server or configuration, you might have set that password.
After completing above steps, press the Test button. If the connection to server succeeds, it means all parameters are correct. Save and Close the dialog. Next time on start, StarCode will use these parameters.
Please visit website for complete MySQL installation guide and tutorials https://www.starcodepos.com/support/mysql_installation_guide.php
The first step after installation is to create inventory and sales databases. Database management is slightly different in Express and Network modes of operation. We will cover this topic for both variants in the following sections.
In case of Express mode sample database are created after starting the application for the first time. There are some sample products that you can experiment with.
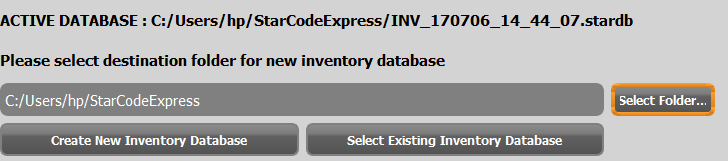
Inventory Database: Inventory database is the main database that keeps track of inventory, users, customers, vendors, expenses, and purchase orders. You can create a new inventory database or select an existing database which you already saved. This could be a backup copy of the database, or transferred from some other computer or device via USB, Dropbox or Google drive.
In order to create a new inventory database, you would have to specify the folder on your computer or device. On clicking “Create New Inventory Database” system would ask you for the name of database.
Inventory database are files ending with “stardb” extension. You can easily copy to USB, Dropbox, or any other online drive to share with other computers or devices.
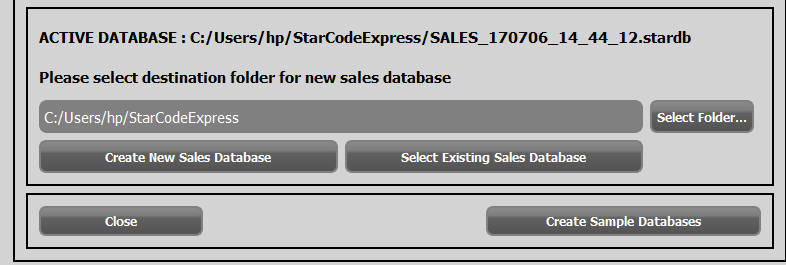
Sales Database: All of your sales transactions go into this database.
It keeps tracks of your sales, discounts, products sold, and customers who purchased the products. Sales database can grow significantly in size depending upon your sales volume. It is highly recommended that you keep an eye on the size of this database and create a new one if database size grows very large and you notice any performance issue. It is recommended that you backup databases at regular intervals and archive the older databases. A good practice would be that you archive sales database each after six months or three months.
While creating a new sales database, system would ask you to set the starting serial number for receipts or invoices. POS will start generating serials for sales receipts or invoices from the specified serial number.
On Each start, StarCode in Network mode will check for the database connection, and connect automatically to last saved database. It will also allow you to change the database from login dialog.
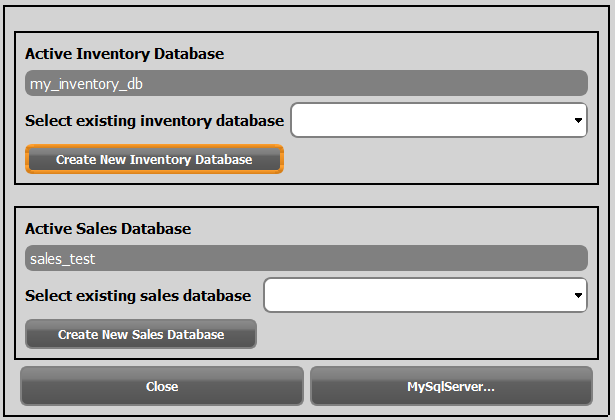
Inventory Database: Inventory database is the main database that keeps track of inventory, users, customers, vendors, expenses, and purchase orders. You can create a new inventory database or select existing database from the list. You need to have MySQL server configured and running before creating or selecting any database. You can launch MySQL server settings by clicking on "MySQL Server" button.
Sales Database: All of your sales transactions go into this database. It keeps tracks of your sales, discounts, products sold, and customers who purchased the products. Sales database can grow significantly in size depending upon your sales volume. It is highly recommended to keep an eye on the size of this database and create a new one, archive the older one at appropriate intervals. A good practice would be if you archive sales database each after six months or three months.
While creating a new sales database, system would ask you to set the starting serial number for receipts or invoices. POS will start generating serials for sales receipts or invoices from the specified serial number.
It is recommended that you backup database from time to time to some external storage. Backup and restore procedure is different for Express and Network modes of StarCode.
Backup: There are two methods to backup express database files. First method is to copy the inventory and sales database files manually to desired location. The path of these files can be found from databases dialog. These files are located in the selected folder shown on the databases dialog. Second method is to launch backup dialog of StarCode. It will copy the inventory and sales database files with time stamp to your selected destination.
Restore: In express mode, restore operation simply means selecting the already backed up database file. Open databases dialog from the home screen. Click on “Select Existing Database”, and select the file which you have already saved. It is recommended to copy the file first to some folder on your computer or device and then set the folder path from databases dialog.
It is RECOMMENDED to install MySQL Workbench Utility for backup and restore operations. You can also perform backup operation by using the Backup function of StarCode in Network mode. Recommended method is to use MySQL Workbench. This utility is available free of cost and comes with MySQL installer. There are many video tutorials available on YouTube for backup and restore operations of MySQL. Backup and restore in Network mode is actually a backup and restore of MySQL database.
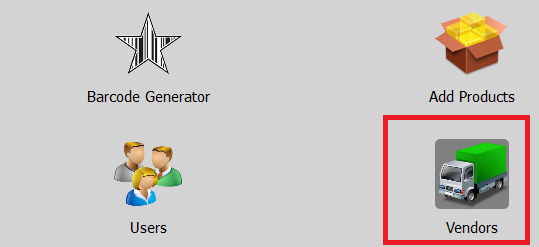
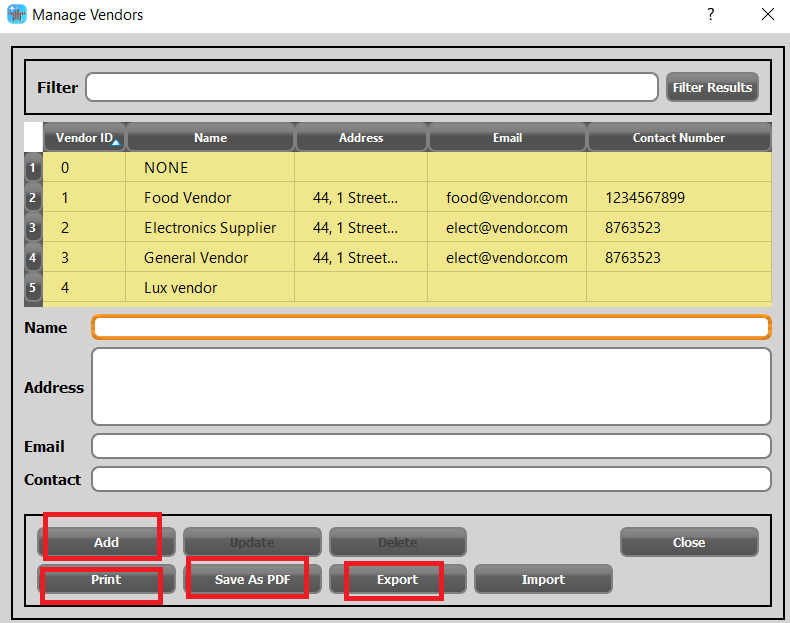
Vendors or suppliers are integrated with other functions in the system. While adding stock, you can associate vendor to that stock. It is also possible to have multiple stocks in the system of the same product and purchased from different vendors.
Purchase orders also require valid vendor or supplier ID in the system. Vendor management dialog can be launched from Home screen, or Tools menu. It allows you to add, edit, or delete vendors in the system. You can also export the list to CSV file, or print to PDF file. Filter box at the top allows filtering the results based on text entered in that box.
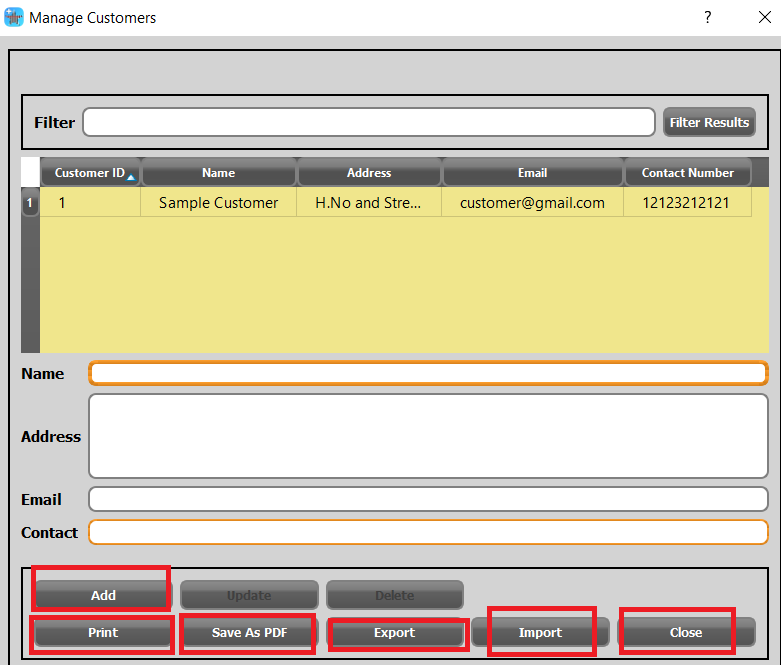
Customers are integrated with other functions in the system. While selling stock you can associate customer to that sale. POS module allows selecting the customer. In report section, you can see the customers and their corresponding products along with quantity.
You can launch customer management dialog from Home Screen, or tools menu. It allows you to add, edit, or delete customers in the system. You can also export the list to CSV file, or print to PDF file. Filter box at the top allows filtering the results based on text entered in that box.
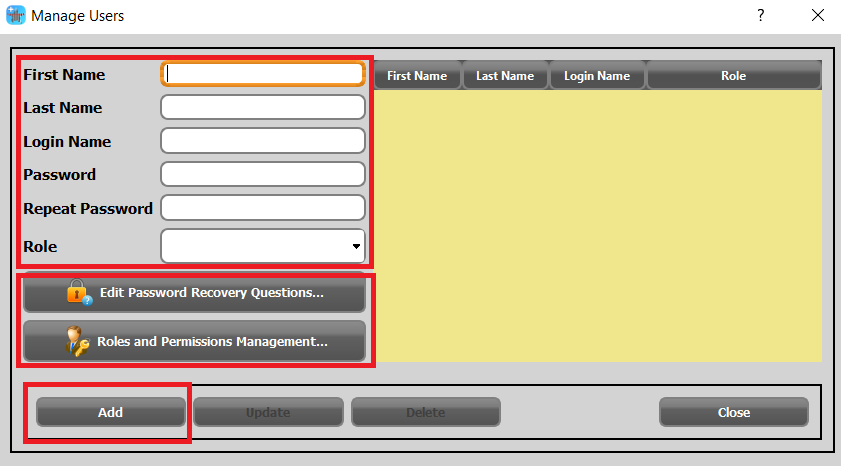
User in StarCode refers to logged in user. After very first installation, there are no users in the system as shown in following screenshot:
System logs you in as an ADMINISTRATOR so that you can add new users in the system and assign permissions on different modules. ADMINISTRATOR role is system role and cannot be edited.
StarCode provides module level security. Each user must be assigned a role.
You can edit module permissions by clicking on "Roles and Permissions Management" button on Manage Users dialog.
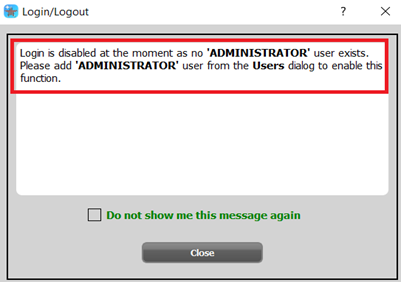
In order to enable Login feature of the software, there must be at least one user with ADMINISTRATOR role in the system. It is highly recommended to restrict access based on job role by using this feature. For example, a sales person should not have access to inventory or purchase management. Similarly purchase manager should be given access to sales.
It is important to note that only users which have access to User Management module will be able to change password of the users. You can simply add a new password of the user if you need to change one.
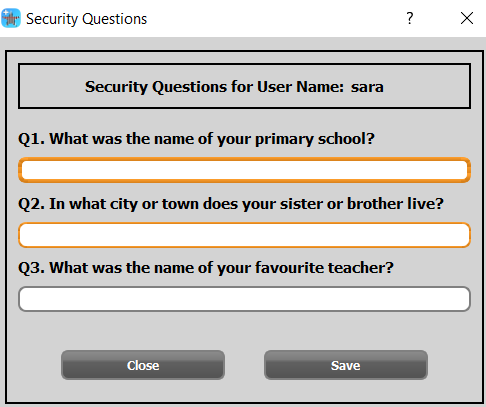
In case if the ADMINISTRATOR user has forgotten the password, it can be reset if he answers correctly recovery questions as shown in the following screenshot:
Only the administrator can reset passwords and no other users can reset passwords. If a user other than the administrator forgets his password, then he will have to contact the administrator to reset password for him.
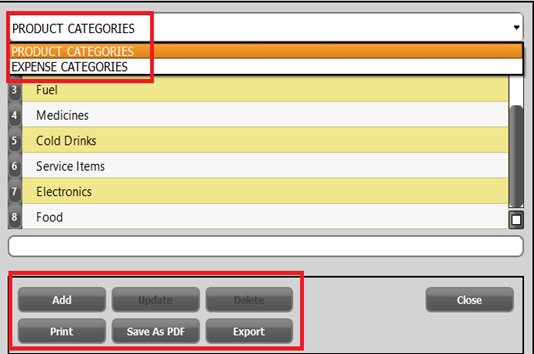
There are two types of categories in StarCode, product categories and expense categories. It is compulsory to assign a category while adding a new product or expense in the system. It allows you to group different products and expenses under one category.
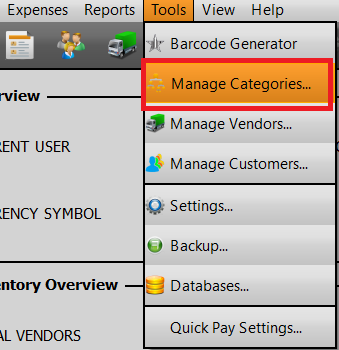
You can open categories management dialog either from Tool menu or by pressing the categories toolbar button. You can add, edit, delete, and print categories. Please note that deleting a category would fail if any products exist against that category in the system. You would have to delete the products first and then category.
Product management allows managing inventory products. Product in StarCode is an item that has following attributes:
1. Product Code
2. Product Name
3. Product Description (optional)
4. Type of Product (Service Item, or Stock Item)
5. Unit Name and Sub Unit Name
6. Tax Rate
7. Category
8. Product Image (optional).
Please note that product itself does not have any stock or inventory. You can add multiple stocks from different vendors against one product. Whenever you add a new product, a stock with zero quantity is added. One product can have one or more different stocks with different stock codes. If you click on product management button, following screen is displayed:
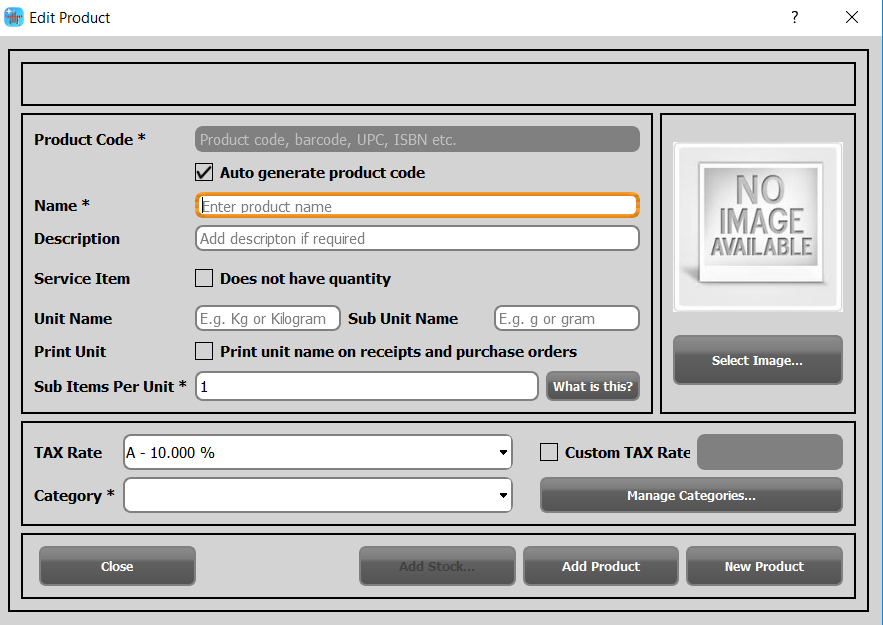
Product Management allows searching, sorting and editing products. There is a shortcut available for adding new product on the Home screen. If you click on Add New Product button on top of the Home Screen, following dialog will be shown:
Product Code: Product code is the identifier of a product and unique in the system. It could be any alpha numeric (consisting of alphabets, or numbers, or both) code up to 50 characters. If you check "Auto generate" option, system generates next available code and assigns it to the product. If you want to assign your own code, then uncheck the box under product code field.
Name: Any text up to 150 characters in length.
Description: Any text up to 250 characters in length.
Service Item: By default it is unchecked and it means the product is normal stock item. If you check it, then the product will be treated as service item. Service items are products which have no quantity. For example, a healthcare provider, such as a dentist or doctor, provides treatment or performs procedures. These activities represent services.
Even retailers and contractors — businesses that you typically think of as selling tangible physical goods — often sell services. For example, a retailer may gift-wrap a purchase, which is a service. A contractor may provide services such as painting or cleanup.
Unit Name: You can specify the unit name (for measuring quantity) of product in this field. For example, if the product is Potatoes, then the unit name would be “Kg” (Kilograms). If Sub Item Mode is enabled then Sub Unit Name field will be visible as well, and in this case the sub unit name would be “g” (grams).
Other examples would be Liters (L), Milliliters (ml), Meters (m) and Centimeters (cm).
Product Image: It is recommended to place all product images in one folder and select product image from this folder. You would also need to set the path of Product Images Folder from Settings Dialog->Product Images Folder Settings.
Tax Rate: You can either assign one of the pre-defined tax rates, or custom tax rate. If some product is exempted from sales tax, you can assign a custom tax rate equal to 0. In order to assign custom tax rate, you would have to check the custom tax rate box.
Product Category: You would have to assign already existing category to this product or create a new one by clicking on “Manage Categories” button. It helps to group similar products. For example, all food items should be assigned to Food category.
After filling in all the necessary information, you can add product by clicking on “Add Product” button. System would perform all necessary checks and would report success on successful operation.
Add product function adds corresponding stock of the product with zero quantity while adding product in the system. “Add Inventory” button is enabled after adding the product. You can press this button to update the inventory or stock information of this product. Please note that system assigns stock code same as the product code. You can keep this code or change it from Add/Update Inventory dialog. Adding or updating inventory is explained in detail in the following section under inventory management.
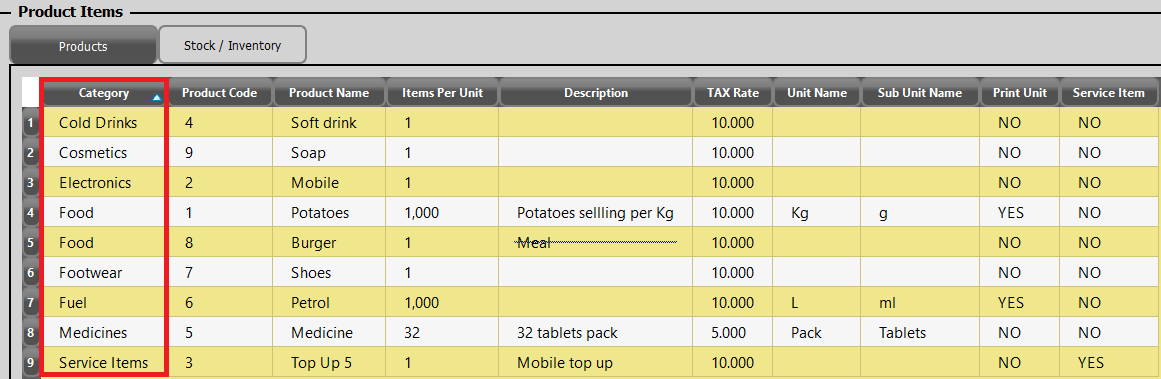
Stock/Inventory Tab: If you single click any row of the table, it selects the product. Product Management has two tabs, products tab and stock/inventory tab. When the product is selected from first tab, second tab shows the existing stock information of that product, which you can see by switching to stock/inventory tab. This allows editing stock directly by a double click on any row of the stock/inventory tab.
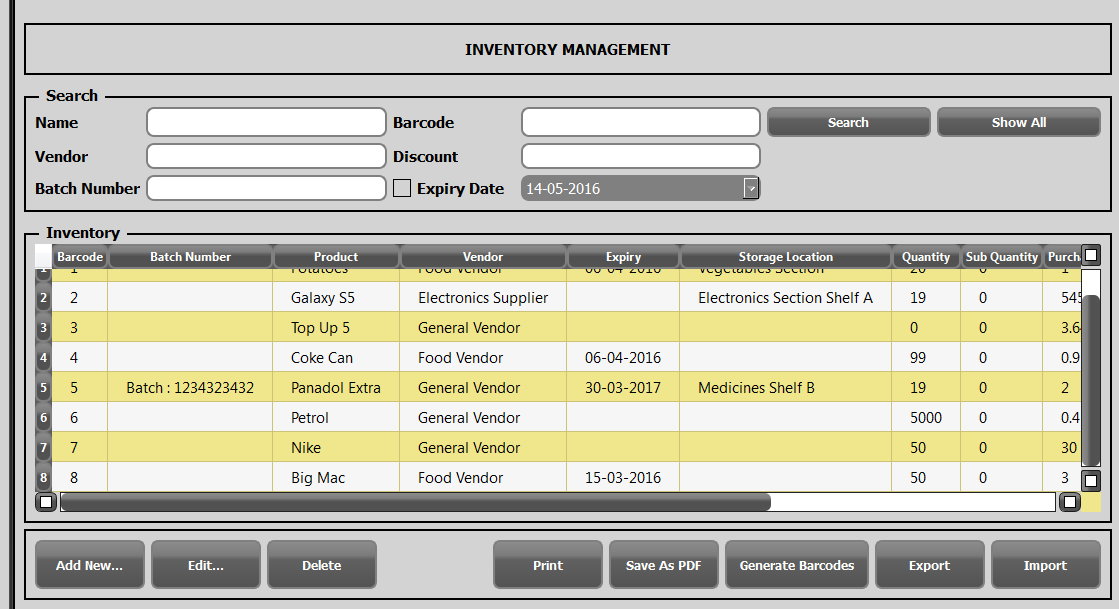
Inventory management keeps track of stocks of items and is linked with other modules in the system such as product management, purchase management, vendors and point of sale. If you click on inventory management following screen will be shown:
Double Click Feature: If you double click on any of the row, product edit dialog will be displayed with the product information you clicked on.
Sorting: All the products can be sorted by clicking on the column header. For example, if you click on Category header, results will be sorted according to category. Similarly you can sort the results according to other columns.
Here, you can search based on name, stock code, vendor, discount, batch number or expiry date. Stock table can also be sorted by columns by clicking on the column headers. If you click on any row of the table, corresponding stock will be opened in add/edit stock dialog.
You can also import and export inventory information from this module, which is explained in detail under inventory import and export section.
If you click on Generate Barcodes button, all of the stock codes/barcodes will be copied into barcode generator with product names and pricing information. This is a very useful function for printing barcodes of the filtered products.
In the following section inventory add/edit dialog will be explained in more detail.
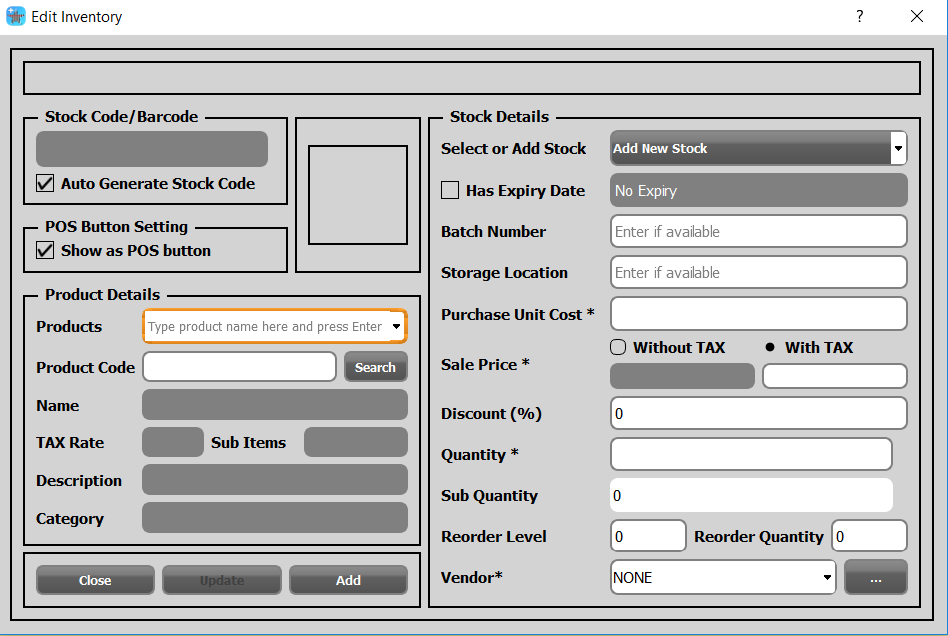
You can open Edit Inventory dialog from a number of buttons and shortcuts available in the application. If you click on Add New button in the inventory management, following dialog will be shown:
This dialog is used for adding new stock or editing already existing stock. Different functions are explained in the following sections.
Stock Barcode/Code: This is the unique identifier of product stock in the system. It could be any barcode or any alphanumeric code, up to 50 characters in length, of your choice. If you add a new product in the system, application adds a stock with zero quantity in the system and assigns product code as a stock code to the initial stock, which you can change later if desired.
Show as POS Product Button: If you check this box, each stock will appear as a POS product button in the POS module. By pressing this POS button, you can quickly add item to current sale without typing or looking for product codes.
Product Selection: In order to add product stock the first step is to select a product. This can be done in two different ways. If you type any product name in the Products fields, auto completion feature would show you different choice. You can select one of them and press Enter on your keyboard. Application will automatically fill in the rest of the information.
Second method is by using the product code. You can directly enter the code in Product Code field and press Enter, or press the Search button and select the product from search dialog, and then press the Enter key.
Select Stock: After you select the product, Select Stock list will show available stock of the select products and with an additional choice to “Add New Stock”. If you want to edit current stock of the product, please select from the list. If you want to add new stock of the selected product then select “Add New Stock” from the list.
Expiry Date: Check this box if the stock item has expiry date. In the reports section you can search products based on expiry date.
Batch Number: This is optional field and required mostly for medicines and food items. You can leave it empty if no batch information is available.
Storage Location: Storage location refers to physical location of the stock. It could be a shelf, room, or warehouse. It is recommended to mark different storage locations and enter those details in this field. This is an optional field, so you can also leave it empty.
Purchase Unit Cost: Please enter the unit cost of stock item. For example, if the stock consists of 50 Samsung Mobile Phones, you would enter here the purchase of one mobile phone. This information will be used in calculating your profit margins on sales. In most cases this cost will be inclusive of tax and other costs related to purchase.
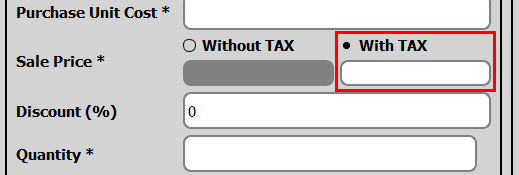
Sale Price: Sales price field has two radio boxes, without Tax and with Tax. This allows entering the sale price with or without sales tax, and system will calculate the other price automatically. You would have to click on the respective radio box (with or without TAX) in order to enable the sale price field underneath.
Sale price is the unit price that you want to charge the customer. For example if the stock consists of 50 Samsung mobiles then you would enter the sale price of one mobile phone in this box.
Please note that if the tax is disabled in the system then only one price will be shown.
Quantity: In this field you would enter the total quantity of the stock. If the Sub Items Mode is enabled, then Sub Quantity field will be shown as well.
Reorder Level: If the stock quantity reaches at reorder level, then system would generate a new purchase order automatically equal to the quantity specified in reorder quantity field. If the reorder quantity is set to 0, then no purchase order will be generated.
Reorder Quantity: Enter the number which you want to automatically order on stock reaching the reorder level. If it is set to zero, then no purchase order will be generated.
For example if the reorder level is 5 and reorder quantity is set to 10. As soon as the stock quantity reaches 5, a new purchase order with 10 items will be generated, which you can review in purchase management module.
Vendor: You would have to associate vendor from the available list with this stock. You can also add new vendors in the system by clicking on button next to Vendor list.
In report sections you can also sort products in stock by vendor name. This feature is helpful when you want to check which stock is low or zero and against which vendor.
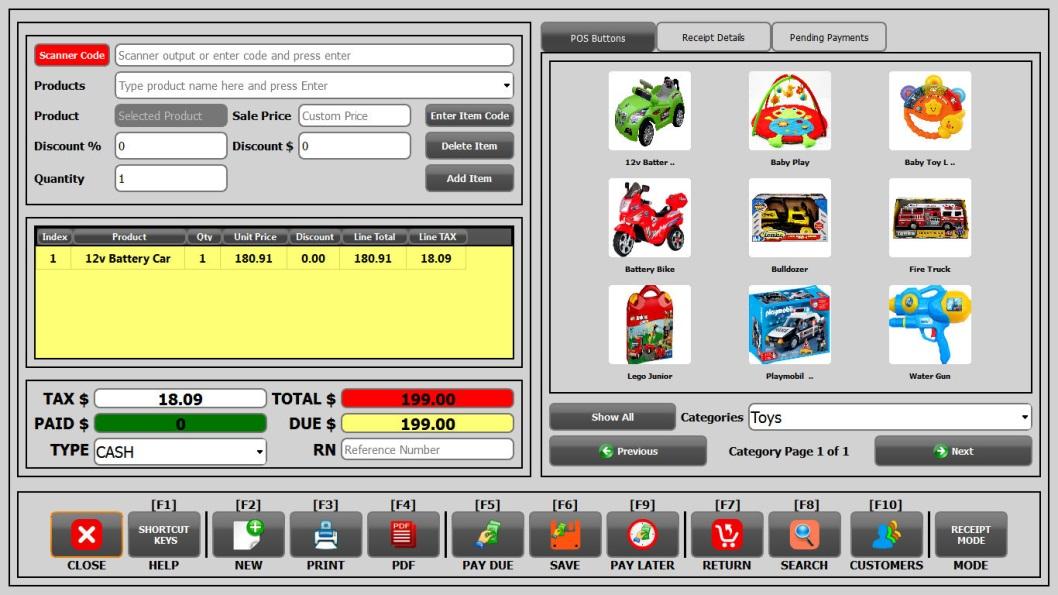
You can launch point of sale module by clicking on the Point of Sale button in the left navigation bar, or from the User menu. Following screen will be displayed after you click any of above mentioned buttons:
Different text fields and buttons on this screen are explained below.
Scanner Code: This field is shown only when you enable it from the settings dialog. This will capture codes generated from the barcode scanner. Alternatively you can also use this field manually by entering a stock code in this field and pressing Enter key on your keyboard.
Products: This field is shown only when you enable it from the settings dialog. It is used to select products by typing the name of the product. Auto complete feature of this field will present you some choices which you can select from the list. After selecting one of the choices you need to press Enter key, and that action actually selects the product.
After successful selection the product name is shown in the Product field, and, sale price is shown in the Sale Price field. At this stage you can change the price, quantity or set any discount. If any discount is already set at the stock level, that will be overwritten by discount set at POS level. The only condition is that discount must not be zero. Finally you need to press Add Item button, or press Ctrl+I key combination in order to add the item to the sales list, below in the table.
Discount: You can set discount either in % or in absolute, but not both.
Quantity: The default value of quantity is 1 and you can change it to any valid number. If you have enabled Sub Items Mode, then Sub Quantity field will be shown as well. If the Sub Items Mode is enabled then Sub Quantity field will be shown as well.
Product Selection by Item Code: You can select POS product in number of ways. One of these methods is to select by entering stock code. If you press the button “Enter Item Code”, a dialog will be displayed where you can enter the item code, and rest of the process is same as explained above.
Deleting Item: Select the item to be deleted by clicking on the table row. After the item has been selected, press the button “Delete Item”. This will remove the item from the list and add it back to the inventory and the due amount will be adjusted accordingly.
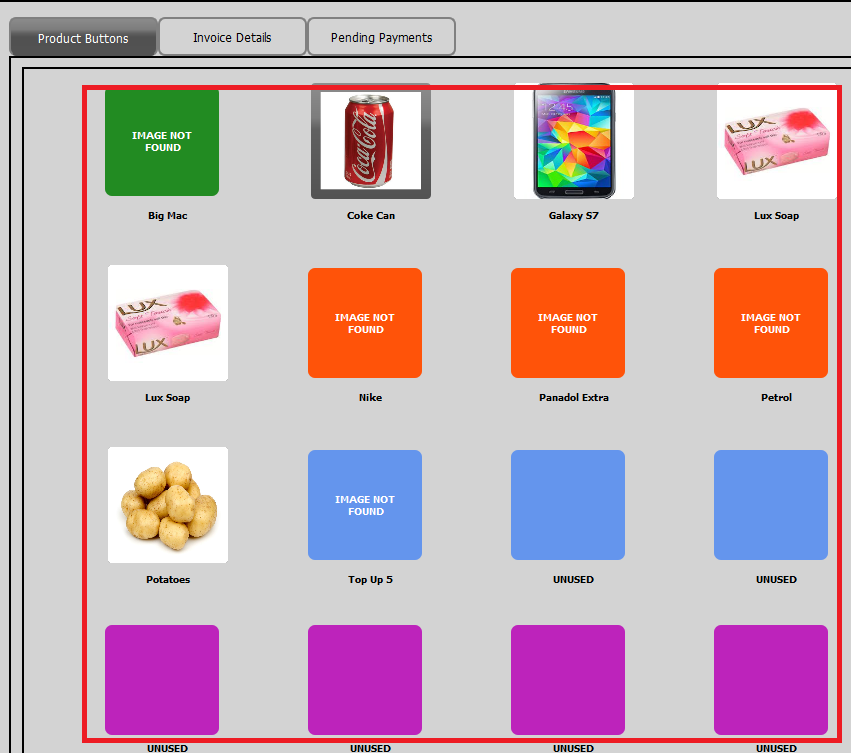
Product Buttons Tab: Product buttons tab will be shown only when enabled from the settings dialog. Product buttons basically represent the stock in the system. It is the quickest method of adding items to the sale. If you do not need to adjust the sales price, by pressing any of the POS button, the item will be added to the sales table. If you want to change default quantity or discount values, please change first before pressing product button.
You can also navigate between product buttons pages by clicking on Next or Previous buttons. You can filter buttons by categories. “Show All” will remove any filters and show all the buttons.
Please note that stock can appear as a button only when you enable it from Add/Edit inventory dialog.
Receipt/Invoice Data Tab: Receipt or invoice data tab is shown next to Product buttons tab and you can easily switch between these two tabs by pressing Ctrl and “T” keys at the same time
This tab shows all the relevant data to a receipt or invoice. If a customer has been selected, that information will be shown here as well. Notes field is used to add any notes to that receipt or invoice.
This tab provides search function as well for looking up invoices and receipts in the system. You can open already saved invoices, update the status and edit any other details as well.
TAX: If you enable tax, then total tax will be shown in this field.
TOTAL: Total will show the total of invoice and receipt payable by the customer.
PAID: In order to close the sale, you need to enter the paid amount in the PAID field and press SAVE button. F12 key will set focus directly to the PAID box. If you already have configured quick pay settings, then you can press one of these shortcuts to enter pre-configured amounts. Please see Quick Pay Settings section for further details.
TYPE: Type field refers to the payment type. It could be cash, credit card, debit card or any one of the available in the list.
RN: RN stands for Reference Number. It is useful entering some relevant number or text which relates to this sale, or payment type. Later on you can easily search on this field from the list of sales.
CLOSE: Close button closes POS screen and returns back to main StarCode screen.
HELP: Help button will show quick help on POS screen, and all key shortcuts which are associated with different functions in the system.
NEW: Pressing this button will start a new sale and close current sale if not completed.
PDF: Pressing this button will always generate a PDF from current invoice or receipt.
PRINT: Print button will print the receipt or invoice depending upon the mode selected. It will print to PDF if you have set the printer to PDF Printer under printing settings. Similarly it will print in small or large size depending upon the selection of printing format under printing settings.
PAY DUE: Pay due button is short cut for entering the due amount and closing the sale simultaneously. This removes the need of entering the due amount manually and saves time in certain situations.
PAY LATER: Consider a case when you want to serve next customer in a queue and hold the current payment. This feature is also useful in restaurant business, where you take the order first and pay at some later stage. After pressing this button, current sale will be added to pending payments tab. If you want to load that at some later stage, click on the payments tab, and then on the payment button which you labelled at the time of holding that payment. Currently this feature is available in Plus editions only.
SAVE: Save button saves current sale. It is necessary to close the current sale by entering due amount and pressing save button, before starting a new sale.
RETURN: Return function is used for returning items back to inventory or stock. If you press this button, it will remain in that state unless you press it again. Once pressed, the POS enters into RETURN mode. In this mode any sale performed will be equivalent to executing reverse transaction. It mean any sale performed will actually add item back to inventory and sale will show negative due amounts.
This mode is used for performing returns in the POS.
SEARCH: Search button is used for looking up current stock items and selecting an item for the stock.
SALES: If you press this button, it will show you all the sales performed in the system. You can search or sort according to the criteria provided.
CUSTOMERS: If you want to associate a sale with some customer, then you would have to select the customer by pressing this button. It will show you customers dialog, where you can add, edit, or select existing customers from the list. If pressed once, this button will remain in that state representing the customer selection. You would have to press it again to clear the current customer selection.
MODE: Mode button allows you to switch between invoice or receipt mode. In invoice mode you can additionally set the payment status, and due date. Printing format of invoice is also different from the receipt. Receipt mode normally refers to normal transactions performed at the retail outlets.
StarCode has complete purchase management module integrated with stock and product management. You can track purchase orders and export directly to inventory.
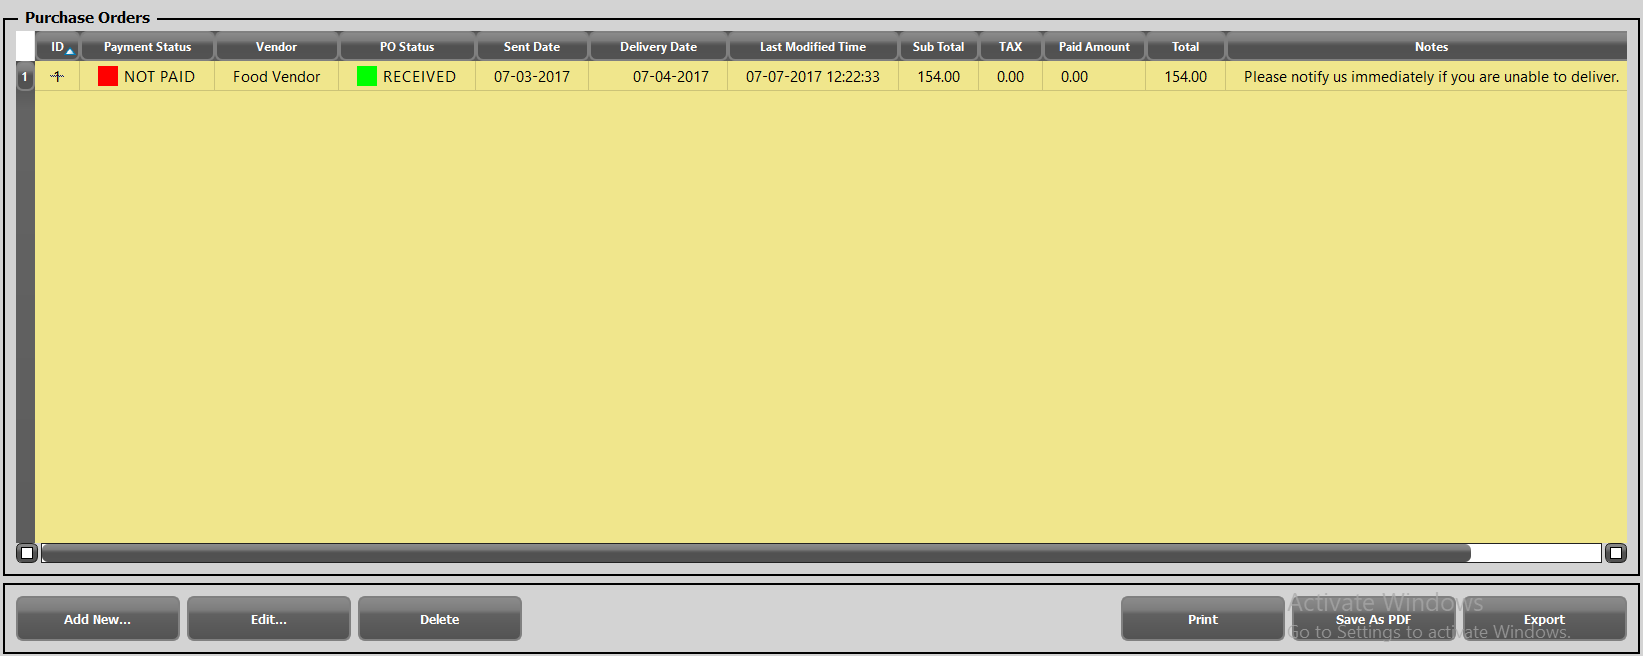
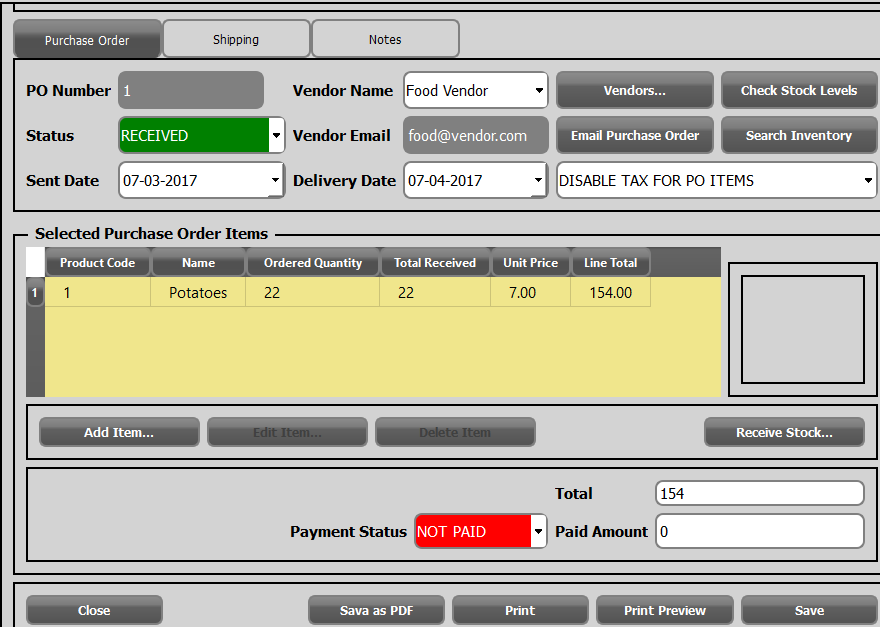
You can open purchase management by clicking on purchase management button available on the navigation bar, or from the purchase menu. If you click on one of these, following screen will be shown:
It shows all the purchase order in the system with their status. Point of Sale generated purchase orders will be in the DRAFT state, which you can review and change status accordingly.
In order to create a new purchase order or edit an existing purchase order, please click on any row in the available list. Following Add or Edit purchase order screen will be shown:
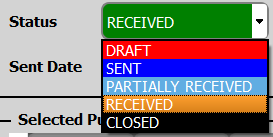
Purchase Order has five following states:
DRAFT: Initially when you create a purchase order. Add items to the order list and set other parameters. You can add any special notes.
SENT: Change to this state when the purchase order has been sent to the vendor. Please add the total purchase cost to Expenses, so that you can track expenses related to purchase. Expenses dialog will be shown on changing status to SENT, where you review the expenses and add it to the system.
PARTIALLY RECIEVED: Change to this state when the ordered items arrive in partial amounts. Please do not forget to receive stock by clicking on Receive Stock button.
RECEIVED: Change to this state when the items have been received from the vendor. System will prompt you to export received items to inventory. Please make sure to complete inventory data.
CLOSED: Change to this state when you want to close the purchase order. Once closed, purchase order cannot be edited again and it will become ready only.
Tax: By default the purchase orders have tax disabled. In order to enable the tax for purchase orders, select the option Enable Tax for PO Items.
Purchase order has two additional tabs i.e. notes and shipping details. In the notes section you can add any comments that will appear on the purchase order, and under shipping details you can select shipping address and provide any special shipping instructions.
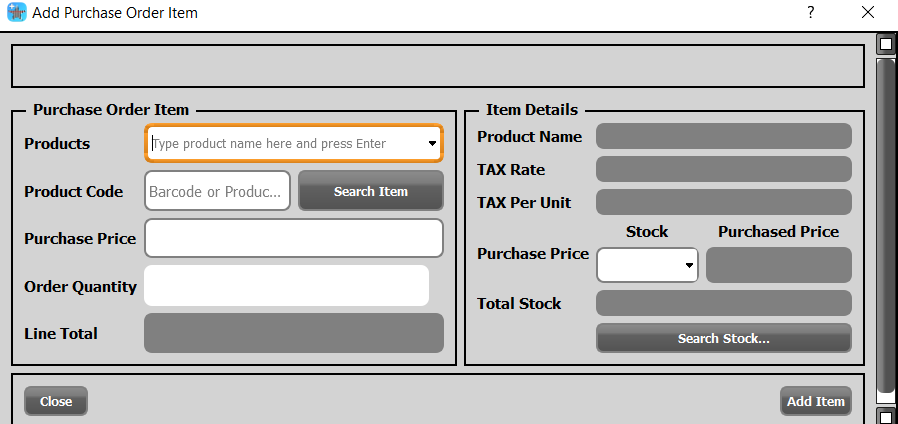
In order to add item to purchase order, you would have to click on the “Add Item” button. On pressing this button following dialog will be shown:
Item Selection: You can select purchase order item either by typing the name of the product in the products field. Auto complete feature will show you a list of items matching the text and you can select one of them and press Enter key.
Second method is from the product code. Either you can enter the product code and press Enter, or press Search button and select the item from search box and then press Enter key.
When you have selected the product, all the relevant data of the selected item will be shown in different fields on the dialog.
Purchase Price: Enter the price of the item at which you want to purchase. If you have enabled tax for purchase order, then there will be two options to enter the purchase price, either with tax or without tax. You would have to click on the radio box (with or without tax) in order to enable the respective price field.
Quantity: Please specify the order quantity of items.
Line Total: Line total will show the total amount for the selected items in the purchase order.
Inventory Data: Inventory data section refers to stock information of the item. This information will be used on receiving stock and changing the status of purchase order to RECEIVED. Depending upon the selections in this section, items will be added to existing stock, or a new stock will be created with the sale price provided in this section.
You can also specify whether this item has an expiry or not. Please note that all of this information might not be available until the order has been received. You can fill it at a later stage when the order has arrived, but before exporting items to inventory.
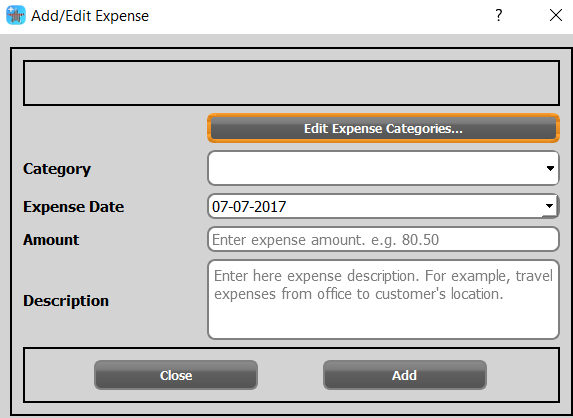
You can add or edit business expense with the help of expense management module. If you click on Add Expense button, following dialog will be shown:
You can select existing expense category, or define new by clicking on Edit Expense Categories button at the top. You can generate different reports based on daily, weekly, or monthly expenses.
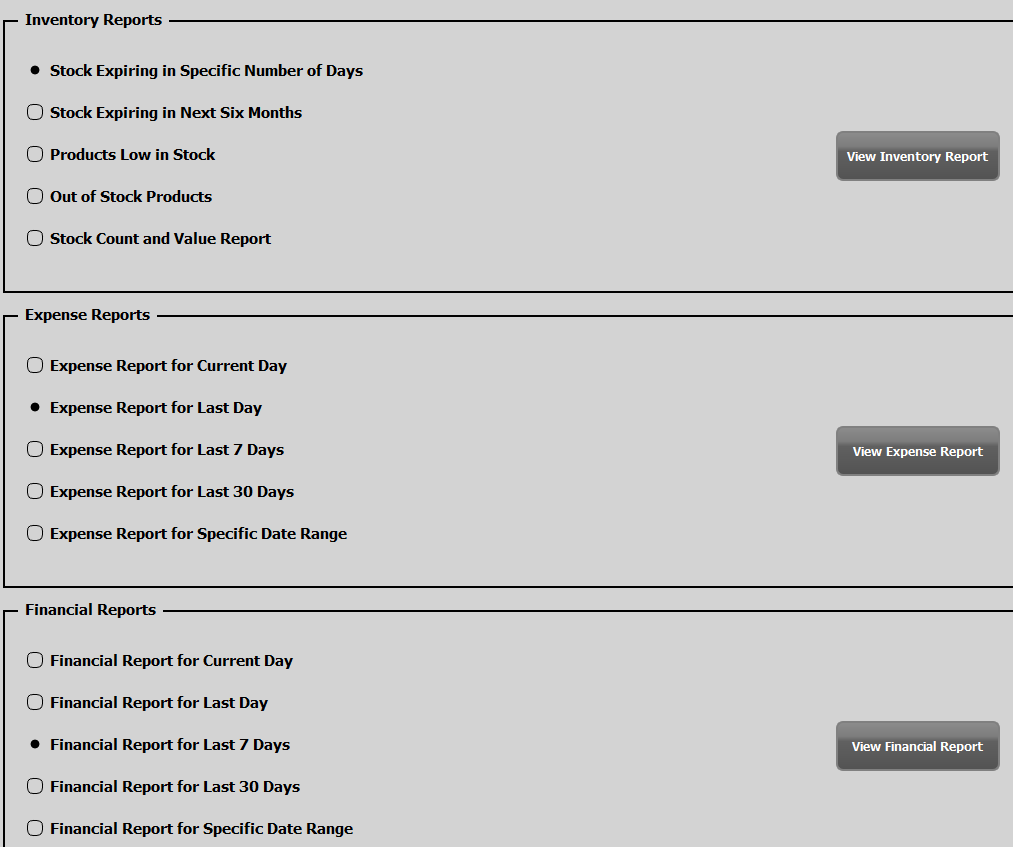
You can open reports management by clicking on Reports button on the main navigation bar. Following screen will be show by clicking on reports button:
There are three types of reports available in StarCode, they are as follows:
1) Inventory reports
2) Expense reports
3) Financial reports
In order to view any report, first you would have to click on the report and select it. Radio button (dot in a circle) shows currently selected report. The second step is to click on the View Report button. Report is opened in a new dialog, where you have additional options to filter, sort, or group the results. If required, you can also print the report to PDF or normal printer.
You can export the complete inventory data from Inventory Management module or from the Inventory menu.
StarCode exports data in CSV file. All the values are separated by comma, or depending upon the selection under Settings Dialog. You can open this exported file in Excel or some other program of your choice.
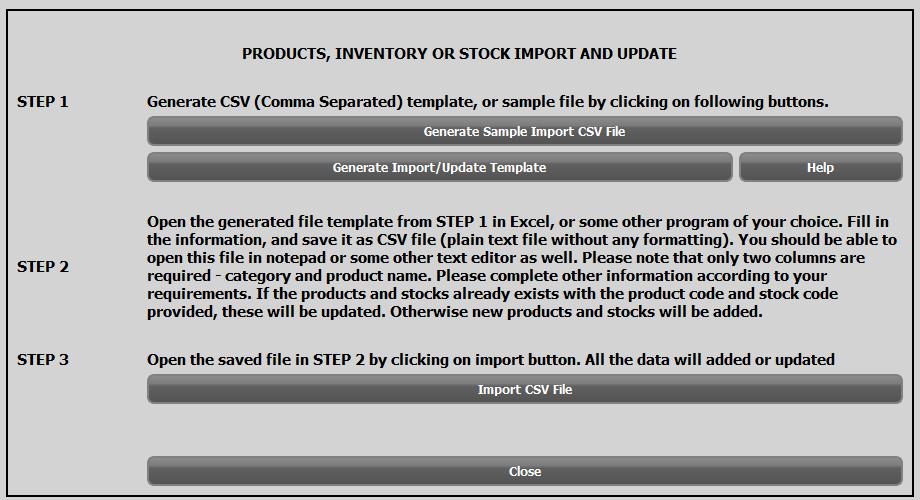
One powerful feature of StarCode is that it can import the same file to the system again. If you have updated any details in the CSV file, for example product prices or quantities, those changes will be updated in the system.
You can launch Inventory import dialog from inventory menu or from Inventory Management module. Following dialog will be shown by clicking on Inventory Import menu item.
This utility is for importing existing data in spread sheet in the CSV format, and updating products and inventory data. Please enter the data in file according to your requirements and whatever is available. Only two fields are required, i.e. category and product name. If no product code is provided, a new product code will be assigned to product automatically, same is the case for stock code. If no stock code is provided a new code will be generated and assigned to stock. If the code is provided (both for product and stock), and the code already exists in the system, system will update the existing product and stock data.
For the sales and purchase prices two columns are provided. One column is for including TAX prices and the other with TAX prices. You do not need to fill both columns. Fill the column with prices either with TAX or without TAX, whichever is available and suits your requirements and leave the other column empty.
You can use already exported file for import as well. Please note that when you export data to CSV file, system writes purchase and sale prices both with and without taxes. If you are using the same file for import, then make sure you keep only one price, with or without tax and clear contents of other column.
For service item column, enter y (short of Yes), or n (short for No), and same is the case for print unit name column if you want to print the unit name of the product on receipts.
System will fill other information with the default values. You can also generate a sample CSV file with some data and experiment with the import utility.
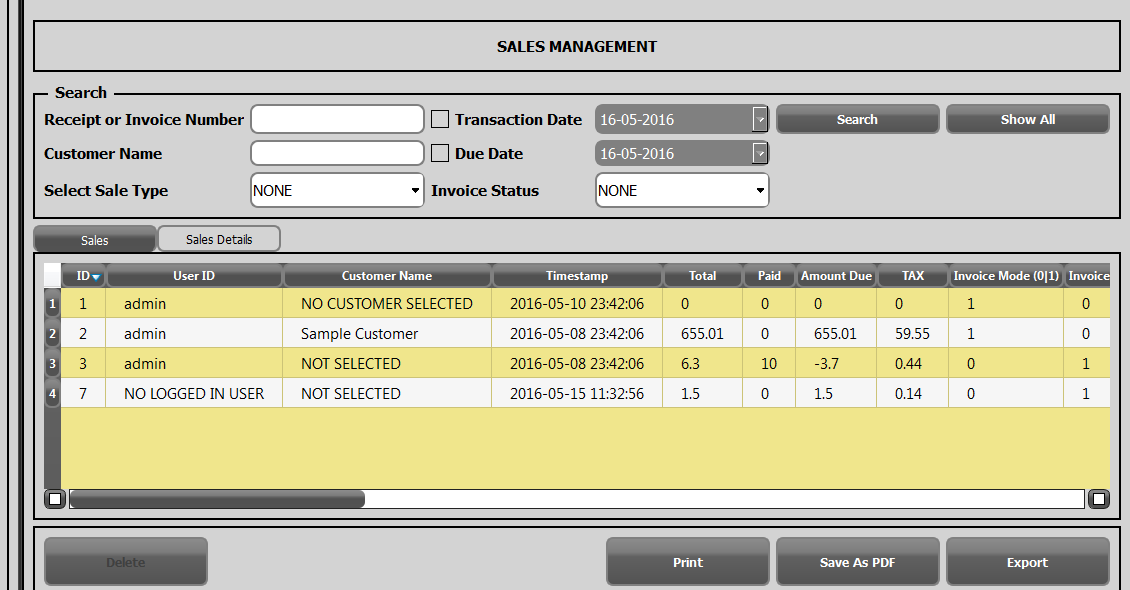
You can open Sales management by clicking on Sales Management button on main navigation bar. Following screen will be shown:
Sales management has two tabs i.e. sales and sales details. If you select a row from sales tab, sales details tab will show the details of that sale. These are sales which have been performed from Point of Sale module.
This module allows printing, or exporting to CSV file all the sales transactions. You can also perform searching and sorting on these transactions. You also have an option to delete any transactions from the system.
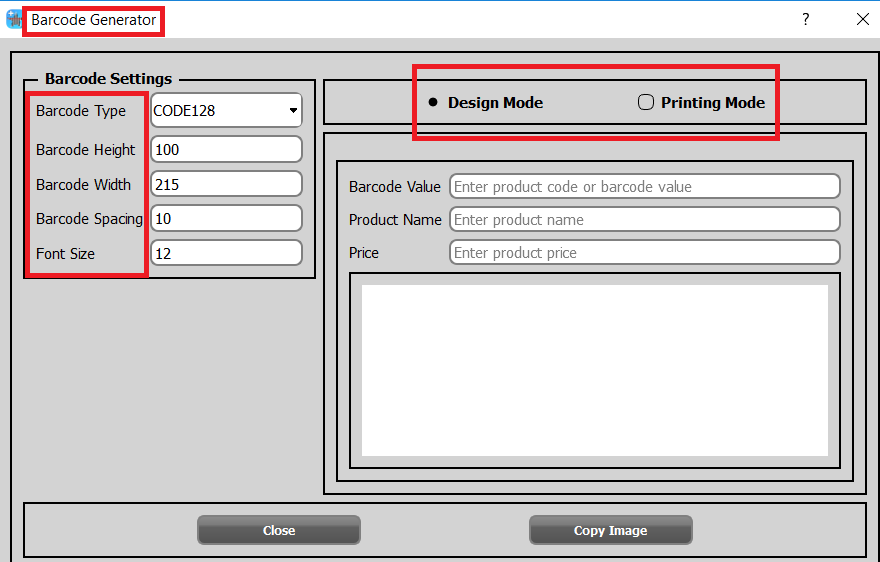
StarCode Plus and Pro editions have complete barcode generation module. You can launch it from Tools menu, or directly from inventory management module. Following dialog will be shown, and details of different functions are provided in the following section.
There are two types of mode as shown in the above screenshot i.e. design mode and printing mode.
Design mode: It has following features:
Barcode Type: You can select the barcode type from the list of available format. Currently over 50 types are supported.
Barcode Height: Barcode height represents the height of printed graphic of barcode. You can adjust the height according to your requirements.
Barcode Width: Barcode width represents the width of printed graphic of barcode. You can adjust the width according to your requirements.
Barcode Spacing: Spacing represents the horizontal spacing between printed barcodes on page. You can increase or decrease according to your requirements.
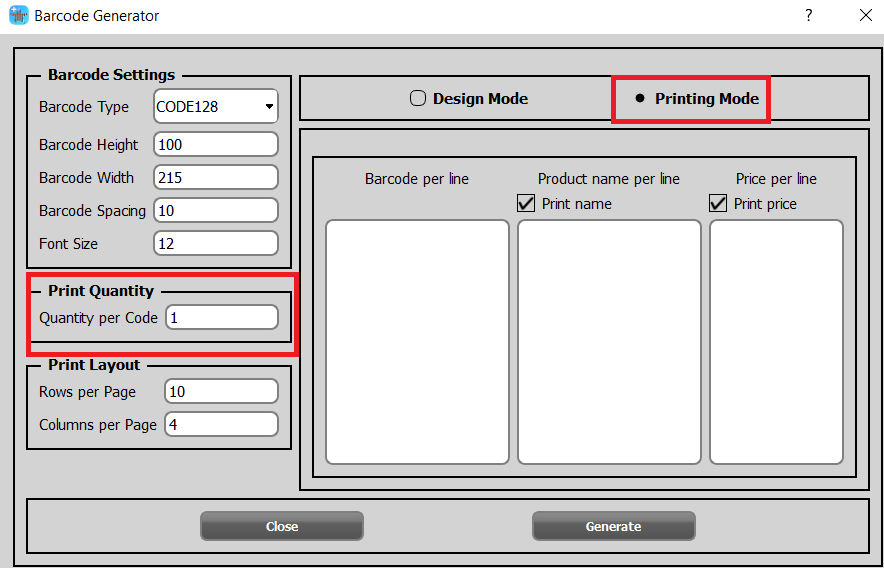
Printing mode: Following is the screenshot of printing mode:
Input Data: In order to generate barcodes you need to provide input data. The required input for barcode generation are barcodes in textual form that you need to enter in the box titled “Barcode per line”. It could be single value or multiple values separated on each line. If you want to print the name of product along with barcode, then check the box “Print name”, and enter the name of product. Similarly, if you want to print the price of the product, then check the box titled “Print price”, and enter the price in the box titled “Price per line”.
Quantity: Quantity means the number of barcodes per value that you want to generate. If there are two values provided in the box “Barcode per line”, and the quantity is set to 10, then in total 20 barcodes will be generated and printed (10 per code). This feature is useful when you want to print papers only with one barcode.
Rows per Page: You can change the default value to adjust the number of rows which are printed per page.
Columns per Page: You can change the default value to adjust the number of columns which are printed per page.
After filling in all the required information, click on Generate button. This generator will generate the PDF file, and it may take few seconds to load after printing. Please save this file with some different name on your hard disk before printing more codes with the help of this generator.
InveGix Technologies